Tuesday, November 27, 2012

Why I don't make candy....often

First of all I shouldn't make candy because I eat too much while making it.  Sad but true.  Secondly, I don't have the patience for candy, or something or other.....

This is what I have.....
See, not so bad yet.  They are kind of the same size, and mostly ball shaped.

ah heck.....

I started out okay.  They tasted divine, they were nice little balls, then it came time for dipping, and I FAILED!!!! I am going to take a self-imposed candy making break for at least two years, unless someone can tell me an easier way to dip!

By the way, what are these yummy balls of divine?  My mom calls them Martha Washington Bon-Bons.  I looked that up online, because her directions are a bit sketchy, and discovered that most people do not put cherries in their Martha Washington Bon-Bons.  Who knew? 
So here is our family recipe:

2 lbs powdered sugar
7 oz coconut flakes
2 cups pecans-not just chopped like at the store but chopped fairly small, smaller than pea size.  (I missed that step because I forgot and my mom's recipe just says chopped)
10 oz maraschino cherries-chop these bad boys up too.  You don't want big chunks of cherry in your candies, just nice little pieces all throughout.  (Yes I know I missed one, and it is pictured above).  Save the juice. 
1 can Eagle Brand milk.  Why?  I don't know that is what my mom said. 
12 oz chocolate chips
1 cake of wax

mix everything together except the chocolate and wax, obviously, then let it chill.  If your filling is a little dry still toss in a LITTLE cherry juice until it looks right.  When I stated I let it chill an hour, but I gave up and went back later.  Just cover it and let it chill overnight.  Make sure you cover it.  Shape into balls.  I don't really have a good method for this, but the colder the filling the easier it is.  Then place these balls in the freezer, cover them, mine have a bit of freezer taste because I didn't.  Leave them in there for at least an hour.  The colder the better, but don't let them get freezer burn.  Melt your chocolate and wax in a double broiler, and prepare for dipping.  I am no longer qualified after this point to help you.  My mom's recipe says use a toothpick and dip in the chocolate.  This did not work for me. 

They really are good, and I really am not in the mood to eat anymore!

Monday, November 26, 2012

Pita Bread and new yeast

I used to make bread every week for big L.  She used to eat jam sandwiches.  It was a bit of work.  Some weekends it was a challenge.  One week, I bought pita pockets from the store, that were okay for her to eat, which was a joy.  The only problem is there is only one brand she can eat, and she will only eat whole wheat.  The store is always running out of them. 

Today I decided to try my hand at making them myself. 

It was pretty easy, but I didn't get a poof in the middle, so I think I needed to let them rise a little longer, or something. 


It was easy.  Made the dough, let it rise, split it into balls, cook for a couple minutes.  Viola!

Emeril's Whole Wheat Pita Bread
1 1/2 cup of warm water
1 package active dry yeast
1 1/2 tablespoons extra virgin olive oil
1/2 tsp of honey
3 cups whole wheat flour
2 tsps salt
flour for kneading/dusting

PREPARATION:
  1. Pour water into the bowl of an electric stand mixer with dough hook attached. Add yeast, olive oil and honey. Allow yeast to bloom until it begins to foam, about 5 minutes. Add flour, then salt. Mix on medium speed for one minute. Turn the mixer down to low and mix for 2 minutes longer. Increase speed to medium and continue to mix 2 minutes longer. If at any point the dough wraps completely around the hook and is no longer kneading, turn off the machine, scrape the dough off the hook back into the bowl and return to mixing. Transfer dough to a clean work surface and knead by hand for one minute longer or until you have a round, smooth, elastic dough. Pour 1 tablespoon of olive oil into a medium sized bowl. Place dough into bowl and coat with the oil by turning over. Cover with a clean damp towel or plastic wrap and place in a moderately warm, draft-free place until doubled in volume, usually about 2 hours.
  2. Position an up-side down 18 x 13 aluminum sheet pan or a baking stone on the middle rack in the oven.
  3. Preheat oven to 500 degrees F.
  4. Transfer the proofed dough to a clean work surface and knead it by hand until it is round, smooth and elastic, about one minute. Divide the dough into 16 pieces, (2 ounces each) and shape into balls. Cover with a clean towel and allow to proof until expanded slightly in size, about 20 minutes.
  5. Dust a clean work surface with all-purpose flour. Roll dough into 6-inch circles. You may stack them between parchment paper or clean towels. Carefully and quickly place them in the oven directly on the baking sheet or stone. You may bake 2 or 3 at a time. Cook pitas for 2 minutes or until puffed. Remove with a metal spatula. Repeat with remaining dough. Serve hot or at room temperature. Once cooled, pitas may be stored in a re-sealable plastic storage bag for up to 2 days.
  6. Alternatively, the dough may me made a day ahead. After the dough has been kneaded and put into the bowl with the olive oil, place it into the refrigerator to proof overnight. The next day, pull dough from the refrigerator and allow it to sit at least 2 hours before proceeding with the recipe.
I used a baking stone.  I did not give it the whole two hours to rise, so that may be why my puff is missing.  They did however puff up nicely. 

I actually made bread this weekend in my bread maker as well.  I used up all my Fleishmans yeast and so I opened up my new yeast.  I decided to change brands of yeast because I have been having a hard time getting a good rise out of my whole wheat breads.  I tried the brand at Costco it was horrible.  I decided to try go with the brand sold by King Aurthur Flour, which has quickly become my favorite flour, we especially love the white whole wheat.  It works well in pancakes, and other lighter breads you want white flour for normally.

SAF Red Instant Yeast was awesome.  My dough for the pitas doubled in 1 hour!  My bread in the bread machine rose and stayed that way throughout the baking cycle.  It was great!  I didn't have to work twice as hard to get a nice loaf of bread.  

Thursday, November 15, 2012

A Beginning....:-)

I love plants, and gardening, always have.  One of my biggest regrets when I moved from Denver was losing my awesome garden and tulip garden.  Okay the garden wasn't quite up to awesome when I left, but it was on its way, and the tulip garden was beyond awesome.  I also had the nicest lawn on the block, and took great pride in my lawn care.  The kind of yard/garden you can have in Denver does not translate well to the so called valley of the sun, or hell hole, or whatever term you want for this hot and dry place I currently live.  While there are a lot of nice things about the weather, the ability to grow lush GREEN gardens is not really one of them.  All green gardens have a lot of brown, or my favorite (HA) cacti. 

The people who built the house we live in were obviously gardeners.  They were also very desert landscape friendly gardeners, though why they felt the need to plant so many palm trees is beyond me.  I have never really been a fan of the palm tree (which is not native to this desert).  They don't provide much in the way of shade, and I just don't think they are that pretty.  That is my opinion only of course as beauty is in the eye of the beholder. 

Last week I decided I was ready.  My brown thumb has been leaving me.  My house plants are thriving, and I am ready once again, to take care of the backyard (the front is a whole other story for another time).  My loving husband has been digging up palm trees by the root for a couple years now.  He has cleared out all of the dead trees, and yucky bushes we inherited upon purchasing our home.  It was now my turn to do something with all the space. 


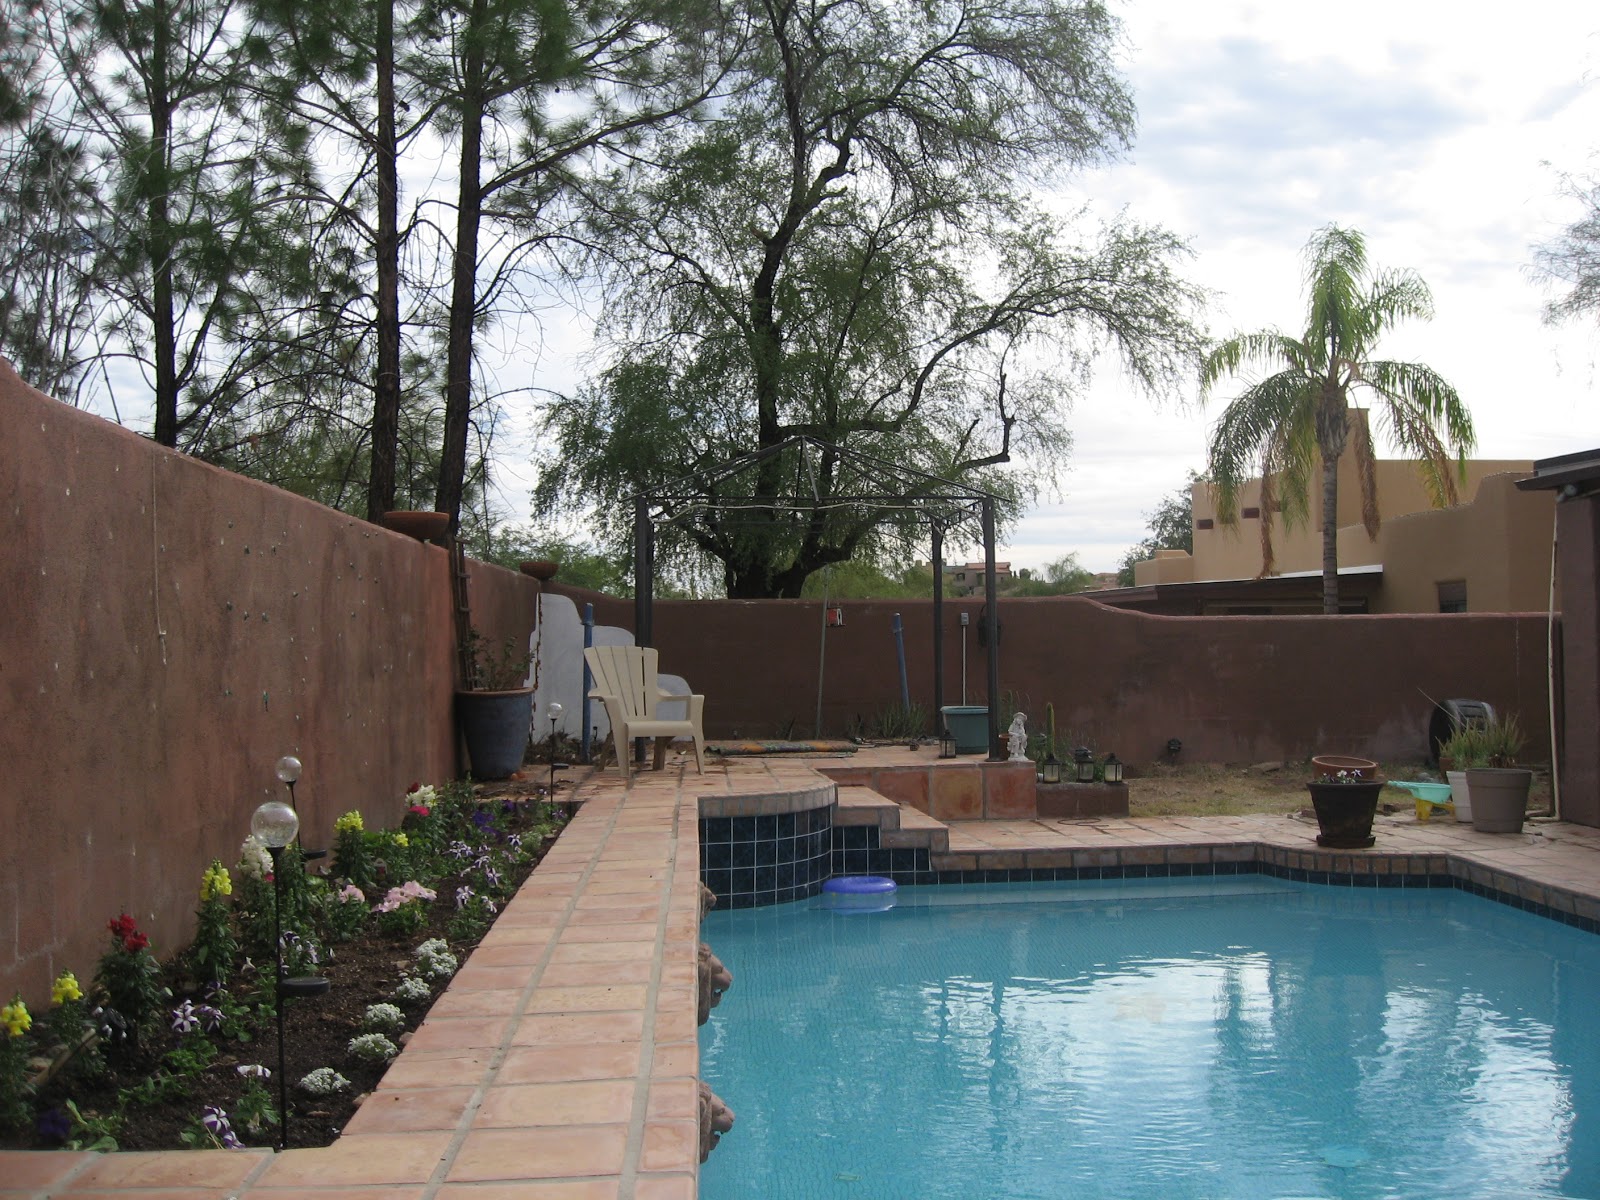
 Welcome to my backyard.  Our very HEAVY gate leans a bit, but it is pretty.  The previous owners put pots all over the fence and house.  These now have pretty flowers in them to welcome all the people who do not come in our back gate.  He he. 
 I swear this daisy has doubled in size in a week.  When I bought it there were no little buds, now there are quite a few.

 Most of the pots on top of our fence were filled with dead stuff, or nothing.  This cactus though was from the original owners.  It seems to like its spot, and I NEVER water it.  The daisy plant is all me though.  They have to be my favorite flower, no matter what type of daisy I love it.  They always make me smile a bit. 
 All of the big ceramic pots were left by the previous owners.  I put lavender in the one behind the spa.  More petunias on the wall, and that pretty green stick thing is called firestick.  It is supposed to be drought resistant, and the tips only turn orange and yellow in the "colder" months.  I think it is pretty. 

 This whole section behind the pool had the silly fan palms and a huge bush in it when we moved in.  The bush kept dropping junk in the pool and the palms, well I already told you how I feel about those!  I am not quite done with this flower bed.  I need to put a layer or mulch or bark over the top to help keep in the warmth and moisture.  It has been getting pretty cool at night here.  I also need to figure out why the solar cells are not charging the batteries on my pretty globe lights.  Note toy in pool.  Thrown there by my little helper of course. 

There are snapdragons, petunias, and some other flowers I don't remember the names of.  Names are not my strongpoint! The rose bush we planted a while back is still alive in the pot at the end, but I think it will do better in the summer if we have the gazebo shade back up so it is not in full sun all day long. 
I originally tried growing strawberries where the flower garden now is.  I think our yield was five berries, and then they died.  I also tried growing other vegetables, but all I did was feed the birds.  This area gets a lot of sun, but is in the shade part of the day as well.  I also discovered that this soil had been worked and was just luscious compared to everything else.  There are a few fan palms coming up (AGAIN) that will have to be yanked out (AGAIN), but this area is awesome.  I planted four little strawberry plants.  We will see how they do. 
 Yet another pot I inherited.  It looks much nicer with something growing in it. 
 These pots that were placed on top of the fence are nice.  However, I don't want to have to remember to water them all the time.  I put in succulents.  You can see the red tips of the leaves on this one.  We will have to do something about the previous owners ugly attempt to fix the fence. 
 You can just barely see the little toes of this succulent peaking up.  I assume they will grow large and quickly like the ones in my kitchen, but I started with little ones. 
 This gazebo is my favorite spot in the yard, and not because it provides a good perch for spying on the neighbors.  Unfortunately, the top ripped not long after we moved in.  My next big expense will be replacing my gazebo cover and the hammock stand, because doesn't that look like the perfect place to relax and read a book? 
 This is little l's way of helping mommy.  We still have lots of pots filled with dirt for her to play in.  She loves being outdoors, I have to bribe her to get her in.  I am sure when she becomes a good swimmer we will be living outside in the summer. 
 This dreary little patch had a big bush in it, hiding the cute cacti.  In the spring I will be planting roses. 
The little one thinks that the pool is there for things to be thrown into.  This includes dirt.  She is mighty quick when she wants to be.  It kind of made a neat little pattern since the pumps were running at the time. 

That so far is the backyard.  It still has a lot of clean up to be done, but you can only fit so much in the trash bin every week.  That and some days I am just to exhausted to keep going.  We worked really hard in the yard and house this weekend.  I also worked on the front entrance, but when I went out to water this morning realized that something had been munching on the plant I chose and had eaten all the flowers.  This is very sad, the flowers were a beautiful shade of blue.  I couldn't bring myself to take pictures of it in that sad state, so we will come back to that area another time.  Until then I just keeping looking out the back doors and enjoying the beginning of making my backyard a place to enjoy. 

Monday, November 12, 2012

FINALLY! A dress that twirls

I have been working on this dress off and on since school started.  I finally! finished, though it is far from perfect, and I wish I could have hidden a few more seams.  However, it passed the L test.  She loves it and spent quite a bit of time twirling around in it.  The skirt flows out as she twirls thanks to the seam gathering on the side.

I think it turned out okay for a first try, but I still can't figure out what I am doing wrong when it comes to fitting the bodice.


It is fully reversible.  We will see which side gets the most wear.  I had it all ready to sew together when I realized her head didn't fit through (my child has a large head, this is not the first time this has been an issue), so we decided instead of making the neck hole bigger, which would have made it sag down or fall off her shoulders we would just put on a button.  So on one side you have a button, on the other, little flowers to cover the button threads.  The pictures don't really do it justice, and you have to see it twirl to understand the lift it achieves. 

I guess I will keep trying, a little here and there. 

Friday, September 28, 2012

What the doc should have made more clear.....

Today I had RF Ablation done on my lower back.  What the doctor told me was that in general the pain relief will last longer, which I am happy about.  What was not stated clearly was that it can hurt much worse after the procedure before it feels better.  Thankfully, I have an awesome husband who let me take a couple pain pills and sleep most of the day.  It is starting to feel better, so for that I am grateful.  My stomach is a bit unhappy about the sedation/pain med combo, but I am hopeful that I will feel fine in the morning. 

If you have low back pain you know that at some point you will try anything to get rid of the pain.  After I don't know how many years of living with this (at least twenty), that is where I am at.  On the plus side, those years have not all been as bad as it currently is, instead it has progressively gotten worse.  That of course is just the way it works. 

I really am hopeful finally.  I have a doctor who understands how I feel and what I want from life.  He too has the same back problem, and he also has little ones at home.  I am hopeful that in the next couple months I will be able to keep up with my kiddo as she rides her bike down the street, perhaps even riding my own bike again!  :-)

Can't say it enough, YAY FOR MY AWESOME HUSBAND!

Wednesday, September 26, 2012

Camping Fun-with a serious note about poverty and hunger

Last weekend I had the joy of going to Girl Scout camp with big L.  We had a very good time.  Mixed in with the fun was a serious workshop for me on Global Action, and a fun workshop for her, that was more her level.  Obviously they did not discuss hunger as in depth for her nor did they discuss sex trafficking. 

However, let it be known that when the girls get older they are shown the world how it is so that they can make it change and become what they want it to be.  A group of girls in our Girl Scout council are truly inspirational.  They created this website: GS Gems, and they do amazing things to raise money and bring awareness to issues women face.  Is this because men aren't important?  Of course not, but women and children make up the majority of people who live in poverty and are susceptible to giving in to trafficking to help their families.  These girls are doing great things, and to think it all started when they were in high school.  Can you imagine the change they can help create as adults? 

This weekend we focused on poverty and hunger, and sustainability.  For lunch on Satruday we all sat down for our family style meal.  One girl from each table went to the kitchen to get the food for their whole table.  One girl came back with a feast, the others came back with one dish which had to be split 15 ways.  This was quite a learning lesson for our girls, on what it means to be poor, to not have enough for the whole family, to worry about what you will get to eat next that will satisfy you.  Most of our children who attended camp have never had to think about where mom or dad will get there next meal.  They have never gone to bed hungry because there simply was no more money to buy food with.  Some girls cried.  The most poignant comment came from the table with everything.  When the situation was pointed out to the kids in the room, one girl said, "I didn't even notice."  Wow. 

I turned to my daughter and said, "sorry, but if we were this poor you would probably die of hunger.  we would not be able to buy the food you are able to eat."  I think it kind of hit home, but after awhile all of the tables got all of the food to eat, so the girls did not walk away hungry.  What would have happened if we had let them walk away without eating the full meal?  

We also talked about education and the fact that women everywhere do not have access to education.  Some families only send the boys to school.  The statistics show that when girls are educated they are empowered to make more choices.  They marry and have babies at a later stage in life.  They get jobs that enable to them to support their family which allows them to raise daughters who follow in their footsteps, instead of into poverty. 

I am trying to figure out to show my troop as a whole some of these issues.  Some will have to wait until they are older.  We talked about fair trade this weekend, and while my girls would be able to play the game we did at this age, watching a video on the horrors that go on in cocoa farming is probably not on the to-do list for awhile.  I am not showing them the video about the 14 year old who had a baby and had to sell her body to feed her family; not yet at least. 

This weekend got me thinking, which was the point.  I try to explain to my child that she is lucky.  That has no impact.  I think it may be time to slowly start showing her.  I don't sugar coat things usually.  We talk about dying, not going to a happy place in the sky.  We talk about how some family's don't even have as much money to spend on food in a month that we spend in one week.  Her eyes get big when we talk about it, but she hasn't connected it to actual people yet.  I think this may be the age to start going to food kitchens and volunteering some time.  I think she may be ready to put faces to social problems, but I could be wrong.  I could be doing this before she can psychologically process this. 

In the meantime, my troop is going to be doing some service projects to learn about how other people live this year.  Hopefully I don't anger any parents. 

What do you think?

Tuesday, September 25, 2012

Cute little tank

The first item I made for big L out of the book Sewing Clothes Kids Love was supposed to be the easiest.  I am just struggling with the measurements, and with the fact that what I measured is not coinciding with the pattern measurements, but I will get it!

This turned out pretty cute, but I may need to make it a bit bigger. 

It was a very easy pattern, and is modifiable.  Next time I will make it a bit longer (I am not a belly showing momma), and add a little more embellishment. 

Monday, September 24, 2012

Stuff Buckets

I moved my Girl Scout meetings back to my house again this year.  It is much easier on me, because I don't have to lug everything back and forth to the school. 

However, my troop has grown to 13 girls, and I have limited seating available.  I do have lots of floor space for us though, so that is great.  I also needed a place to organize all of their books, crayons, pencils etc. 

The council newsletter had a craft a year or two ago and I saved the directions.  Needed:  1 five gallon bucket, foam, and fabric.  The bucket doubles as organizer and sit upon.  The girls got to decorate their own, and they love them.  When I hear, "Where is my....?" I just have to say look in your bucket!


The best part is our local Paul's Ace Hardware donated the buckets, I just had to buy the lids, foam and fabric!

Friday, September 21, 2012

A skirt for me! Charmed I am sure.

This is like big L's "charm" skirt.  It was for me though, so I took fat quarters and quartered them.  Then pieced them together and voila, my own skirt.  I have enough leftover, I will eventually get around to making one for L.  Matching skirts :-), never knew I would be so corny. 

Easy and fun, and I am getting much better at RUFFLING!


Thursday, September 20, 2012

Pants!

I have always been a bit afraid to make pants.  Apparently rightfully so!  Pattern I used is from Sewing Clothes for Kids.

It was only my second time tracing out my own pattern and adding allowances, etc.  I did not do such a great job!  I ended up having to fix the pants after they were done.  The crotch was too long!

However, they are fixed and she loves them.  Unfortunately it is too darn hot to wear them still so she will have to wait a bit!


Front

Back
They are a little long still so I made it so the cuffs have a cute fabric to fold up!  Very much big L. 

Monday, June 25, 2012

Rags and splinters

I have been successfully using very few paper towels for years now, and it has occurred to me that I should probably just give them up when we run out this time.  About a year ago, I bought some new dish towels.  My old ones were worn, and stained, and I was just tired of looking at them.  Plus my rag bin was small and didn't have very many "good" rags.

However, when I switched them all out, I realized, I had a LOT of rags.  I had no were to put them either, because my little bin for rags was just that, LITTLE.

I browsed Handmade Home by Amanda Blake Soule and found a cute idea for a rag bag.  However, I didn't want to use any of my fabric, it was too nice for a rag bag that is hidden in the closet, and I didn't want any thing frilly.  It needed to be sturdy.  My family can be a bit rough on things, and I want the kids to be able to grab things out of this bag without worrying they will rip something and I will have to find time to fix it.

So I made two bags.  One for little rags, and one for big rags (messes are different sizes you know).  For the big one I sewed two towels together.  Then I took an old towel that I hated, and cut it up to make handles.  Viola, it was done.  The smaller one was even easier.  I took one towel folded it in half, sewed up the sides, put on a handle, and I was done.

They might not be much to look at, but they do the job, and I have already told all of my loving family that I have given up on having a house that is nicely decorated.  I will live the rest of my life with random clutter and (at least for another year or so) most of my furniture and other non kid friendly items placed out of the way or in other odd places.  As an aside, the reason a lot of my furniture is not where it should be is little l likes to chew on wood.  I am sure that the paints and stains are not the best thing for a baby.  We hope that she will outgrow this, before she ends up with splinters in her gums. 

Friday, June 22, 2012

Father's Day

My husband has been asking me to make him handkerchiefs.  I just find the idea gross.  I like being able to throw my snot away.  He however, doesn't.  Being the good environmental steward I try to be I decided Father's Day would be a good day to provide him with this.  Of course, I forgot about it until the Monday before, so I was a bit rushed. 

I used an old pillowcase.  Soft, but fraying around the edges a bit.  Then I embroidered, which I don't do, an M in a different color on each one, so that he wouldn't use the same one for more than one day. 

The result:

I made seven, but he used some before I could get the picture.  Forgetful me.  I think they turned out pretty nice and I go to practice mitering a hem.


Fun times!

Thursday, June 21, 2012

Kinderquin

My daughter and I have decided to start making some of her clothes.  Fun times all around, but there are times when she won't be here, and I will want to fit something, or I will be too frustrated to get her to be still so I don't stick her with a pin. 

Of course, I bought a book.  I love books!  Sewing Clothes Kids Love, is a great book.  In it the Kinderquin is recomended.  Basically you have them dress in old clothes that you are okay with cutting.  Then you put duck tape (yes the silly colored kind works great and is not like duct tape) all over them.  You can use long or short sleeves.  Then you cut it off, carefully.  Stuff it, put a hanger in it and voila you are done. 

I think my daughter thought it would be more fun.  She did enjoy being wrapped up like a mummy, until I had to cut it off. 

Front

Back

Complete with hanger, and stuffing

Even shows the curve in her back. 
Hopefully, this will work.  I think it is a cute idea.  After I cut it off she liked it too. 

Wednesday, June 20, 2012

Something just for me.

I decided it was my turn for something.  I checked out my book again, Stitch by Stitch, and chose the next piece of clothing in line learning wise.  The book if you go from front to back helps you to attain new skills with each project then put them altogether in the clothing section.  Unfortunately, the patterns aren't as big as I still am post little l, so I will need to keep losing weight to wear it. 

However, I did it!  I started about three weeks ago, and admittedly stopped a few times in between to make the easier items posted earlier.  I had to give myself a bit of a pep talk and remind myself that I can follow directions!  This weekend though, I was determined.  This wrap around skirt wasn't going to get me.  In the end it did and when I can finally wear it I will need to sit down with my mom or someone more experienced and find out if the pattern was wrong (I doubt it), or I just misread something (most likely).  Here is what I have:
See that tie on the right as you look at it?  It is supposed to be wrapped around and tied to the one by the buttons.  It is not long enough!

Modesty buttons as she called them.  You know, for those windy days when you really don't want everyone seeing your undergarments.  Buttons are some from my mom's collection.  They were 67 cents in the day. 

My most proud moment.  An on-seam pocket, it lays flat!  I know I cut the fabric backwards, but it is inside the pocket!  Who looks there? 
So, fifteen or so pounds and I will be flitting around town in my pretty little skirt!  I love it!  I will say that this skirt taught me a lot.  It taught me I can do this clothes sewing thing I am trying.  I am not perfect, and this is not easy....yet.  I need a lot of practice before I will consider myself good at gutter stitching!  I am sure there will be more sewing projects to come, but I think for a day or two I may start that knitting project I want done by the holidays. 

Tuesday, June 19, 2012

Let's go picnic....

Well, maybe no picnics here anytime soon.  It is too hot to be outside in my opinion. We have been taking comfort in our pool, and enjoying all the shade on our patio, but the temperature is moving up quick, and I hate being hot. 

However, I have been meaning to make this project for some time, so I just sat down and did it.  I took the idea and instructions from Handmade Home by Amanda Blake Soule.  I am finding that I am going to be doing more of the projects from this book than I originally thought, but more on that as they are completed. 

I wanted to make the beach blanket as she called it so I looked around.  I wanted it to be a bit thick, because often grass is damp here from being watered.  I didn't have an old yucky comforter so I hit the Goodwill.  Something I honestly am not a fan of.  However, I didn't want to spend a lot on something that would only be seen when the blanket was all rolled up.  I found a polyester nightmare, that is nice, and put a sheet on top that was a bit old and worn in, but not worn out like its fitted partner.  That was boring, and not what the book asked for, so I stitched some pretty fabrics in as random of a pattern as I am capable of, and this is what I got.

Yucky backing (it really isn't that bad) folded over cute top.

Sewn on tie that will never get lost and always be there to make this a nice portable package. 

The top, like I said, random is hard for me.  
I will admit to not following directions.  After the bias tape fiasco with L's quilt, I did the sew three sides, flip it right side out and finish the top method.  Bias tape was not an option.  It turned out pretty well.  The girls have already eaten atop its loveliness and declared it a success, and apparently a good stand in for a napkin. 

More to come!

Monday, June 18, 2012

Summer Fun: Charmed!

Summer is going by quickly here.  The first week was a rough adjustment, but things are improving!

I have been busy sewing, but I have not had sole use of my computer, so have not posted lately.   L likes to watch shows and play her math games on my computer.  I like that she is being quiet while little l sleeps.

I made what the book called a charm pack skirt.  I did not have any charm packs, so I just used some fat quarters I had.  I love the skirt.  It looks great, and L loves to wear it. 


This is a front/back view.  Though there really is no front or back!  It was easy, and I learned to ruffle.  I like it so much I am going to make myself one, though I will probably make the squares bigger!  The pattern is from Stitch by Stitch by Deborah Moebes.  It is a great book, and I have been learning loads of basics. 

Stay tuned for more!

Wednesday, May 30, 2012

Snacking Well

I don't know about you, but one of my pet peeves (and one of my mother's when we were growing up), is when a child has to stand in front of the refrigerator with the door open to "see" what we have.  Because, you know, it changes sooooo often!  Something may have materialized since the last time they checked.  That and the constant, "I don't want that", when I list off fruits and veggies had me going a little bonky. 

Thankfully, I was actually reading the blogs I follow the other day because Sofia at Sofia's Ideas posted a great one.  It was not her original idea but she gets credit since I read it on her blog.  Put snacks in ice cube trays.  Well, that makes sense for little l, she only has a little stomach, but I wanted L and I to get our five a day of veggies and four of fruit, so we used muffin tins.  We are going to try to do this all summer. 

I think it looks yummy, and I don't have to dirty as many dishes, want a snack?  Get your muffin tray out of the fridge!  This should cut down on the standing there with the door open!
This is mine.  A few veggies short, but I have been eating large salads for dinner. 

little l's.  Imagine the frozen fruit she will eat in those empty spots.  Hopefully giving her a tray with carrots will keep her from eating the bunny's.   

Big L's tray.  Yes hers includes some rice cheese a tortilla and turkey.  Plus a load of shredded lettuce (the only kind she will eat), some spinach, celery, carrots, grapes, cucumbers, raspberries, etc. 
Hopefully, this will help us all and make summer snacking more fun and easy!  As for that husband of mine.  He is not really left out.  He is a vegetable juicer, and if he would blend, and his juicer was not stained with so much juicing time I would join him.  Until then, he gets more veggies in his diets than all of us!

Tuesday, May 29, 2012

My 2 Year Quilt

There is no reason really this quilt should have taken two years.  It was different from what I have done before and I will never make a quilt like this again, but I really have no excuses for it taking so long.  I started out with lots of big L's baby/toddler clothes, cut up my favorites and started piecing them together in the hopes they would make a rectangle.  HAH!  I am not that good or patient, so it is not quite square.  Note to self, even if pieces could be smaller make them a uniform size.  Note taken. 

Also, I used binding on the edges, which I realize is how you are supposed to make a quilt, but I HATE binding, it just never works right for me.  Or maybe I was just impatient to finish this monstrosity and be done. 

Anywho, here it is, after two years, big L's quilt. 


The top looks a little wonky.  That is my inability to make a rectangle out of the mess I cut. 

This would be the first sweater she ever buttoned by herself, hence the importance of keeping the buttons. 

The back.  It actually looks mostly normal, just one area of bunching.  
I am not overly proud of my quilt, but after pointing out all of the areas I could rip out and do again L said, "NO!  It is comfy the way it is!"  What can a mother say to that?